HOW TO CREATE A RESTORE POINT AND RESTORE IT IN WINDOWS XP &WIN 7

Today I going to write the post about “HOW TO CREATE A RESTORE POINT IN WINDOWS XP”  Restoring is nothing about getting back the system without any failure or malware & viruses.  we have to follow some steps for restoring they are given below:-

want to learn the basic command of c language CLICK HERE

When the restoring point must be created!

The Restore point must be created after installing new operating system into the computer.so that the system can be restored back when it is affected or crashed to the restoration point which we have created..

ADVANTAGES

Restoring point must be created after installing the new operating system in the computer because if there is any virus infection or system crash we can restore the system back to its original status(that means we will getting  back the system as when we installed the new operating system)

DISADVANTAGES

There is a small disadvantage in this Restoring Process method that is LOSS OF DATA..during Restoration method we loss the data that is stored after the restoration point is created in the system…while the system gets back to its restoration point it will delete all the data that is stored after the restoration point…

OVERCOMING THE DISADVANTAGES

  1. Creating the restoring point daily.
  2. Taking back up of all data in the computer.

How to create a Restoring point in computer?

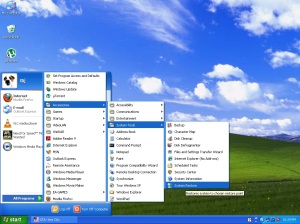
  • Go to MY COMPUTER->ALL PROGRAMS->ACCESSORIES ->System tools
  • Click on system restore point

tools

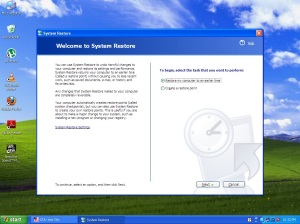
  •  You will get like this IN order to create a Restoring  point Click onàCREATE RESTORE POINT and click->NEXT

cc

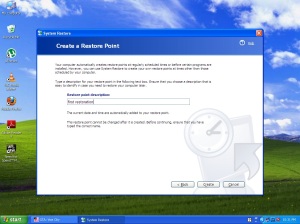
  • It will Ask for restore point description ENTER THE NAME OF THE RESTORING POINT EAXMPLE: FIRST RESTORATION

b

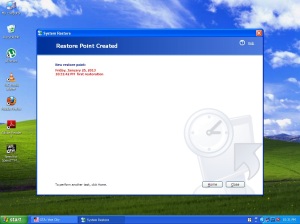
  • Then click on create button Ur Restore Point is Created
  • You can see the below picture as restore point is created

c

Thus we must create the Restore point in the computer…

If there is a system failure or system corruption like viruses & malware u can restore to that point where ur system works good

  • How to restore the created restore point once the system is attacked by viruses or some thing else 
  • same as the first step
    • Go to MY COMPUTER->ALL PROGRAMS->ACCESSORIES ->System tools
  • Click on system restore point

tools

  • You will get like this IN order to Restore Click on the RESTORE MY COMPUTER TO EARLIER TIME and click  ->NEXT

cc

  • And then SELECT YOUR RESTORATION POINT WHICH U HAVE GIVEN AS->> FIRST RESTORATION IN THE PREVIOUS METHOD AND CLICK–>>NEXT
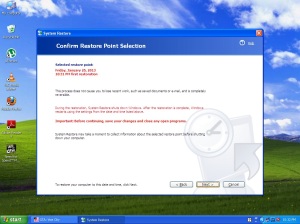
  • You will get the below screen CLICK NEXT TO RESTORE FOR CONFIRMATION

zz


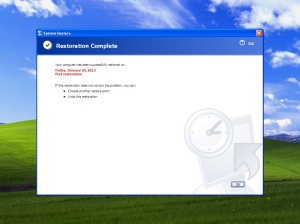
  • After that your system will be restarted automatically and RESTORATION WILL BE DONE 

nn

  • THUS THE SYSTEM IS RESTORED

Thank you i hope you enjoyed this technique…

And my NEXT post will be on HOW CREATE A RESTORE POINT IN WINDOWS 7 WILL BE UPDATED SOON

How to install windows7 & windows8 using usb drive

It is most important tutorials before you go read it 1st read my past tutorial how to make USB Bootable drive so you will be able to make a bootable usb drive. Without it you cannot install the windows and this is good choice to install windows8 from usb i posted a tutorial in my past all about installing windows8 through virtual machine . But there is many problems users face it its require AMD so mostly peoples don’t know much about it then it is best choice to Install windows with usb stick. Follow my instruction and continue reading this.

Image

How to Install Windows8 / windows7 From USB Drive

[Note]I has been Explained Full Step by Step You Follow it Carefully because some un follow steps can probably make some harmful thingy All screenshots also listed below steps so see that and do your steps.[/Note]

Step 1 >> Make Bootable Drive for Installing Windows Click here and Read how to make bootable drive for windows7 / windows8

How to Make Bootable Drive for Windows 7 & Windows 8

Step 2 >> Put your bootable usb drive into system or laptop for installation Once you done it restart your system boot USB drive if it boot automatically then it’s ok otherwise boot USB first from BIOS Setting or Commonly use F12 button for boot drive.

Step3 >> Press F3 it will show you options to select which device you want to boot first you choose your USB name device from keyboard and press enter.

Step 4 >>Once you booted now same steps now Install Your Windows Just Run Setud EmDs and NExt Continue to on which partition to you want to install so step by step you can install your Windows.

2nd Method : If you made bootable usb drive then Run Setup file from USB drive on Windows it means you can also install windows into a windows Once you run setup file it will collect files to temporary drive and make reboot automatically.

online storage guide click here

That’s it all i hope you may like this Guide feel free to post your feedback if feeling any trouble while installing windows.

Test your Internet speed and increase it

Online backup storage or Share Your All Music Data with Cx 10 Gb Free Space on Signup

There and get 10 gb Space instantly Free Store Your Files fast and can make it private and can share with all the world free. its also kind of Backup this is best music sharing site

CX is a new kind of cloud experience that takes content to the next level with a range of unique features: secure storage, real-time syncing, public and private sharing, interactive group collaboration, and intelligent discovery. Easily organize your content, access it on the go, share it with friends or publish it online — you decide what and when. Want to discuss a file with a team? CX does that too with group functionality and a unique file commenting system.

signup here

You Can Store And Access Anytime anywhere at ==>>(www.cx.com)